By default Windows 10 comes with a built-in anti-malware solution. Out of the box, this gives you protection from viruses, ransomware, spyware, rootkits, and all sorts of malware and hackers. In spite of this protection, you may still want to disable Windows Defender. This could be for several potential reasons.
You could be in an organization with a policy that favors another anti-malware solution. You may a short or long-running task or even a service that conflicts with the antivirus. Maybe you have a setup such as a Kiosk that is offline and does not need an antivirus taking up resources.
Unfortunately or fortunately depending on your scenario, Windows 10 does not offer a way to permanently disable Windows Defender or even uninstall it. What it does compromise is when you install a third-party antivirus solution, Windows 10 will disable Windows Defender automatically. This is okay in most cases but not ideal for some.
In this guide, we will use the term, Windows Defender Antivirus. Since the Windows 10 May 2020 Update, the service is now known as “Microsoft Defender Antivirus.”
Is it Possible to Permanently Disable Windows Defender in Windows 10?
The answer is, Yes! It can be done using Group Policy or the Registry. If you just need to disable it temporarily it is better to use the Windows Security app.
How to disable Windows Defender Antivirus using Windows Security
Before we get into the meat of this guide we will show you the simple and basic way. This method is the most common. You can use it in situations such as when installing a program that asks you to temporarily disable your antivirus solution.
To disable the Windows Defender Security temporarily, use these steps:
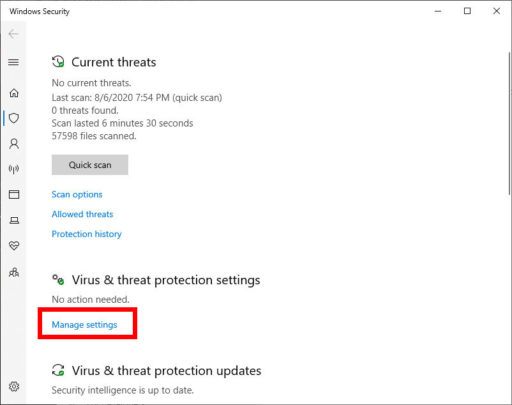
- Open Start.
- Search for Windows Security and click the result to open the app.
- Click on Virus & threat protection.
- Under the Virus & threat protection settings section, click on Manage settings.
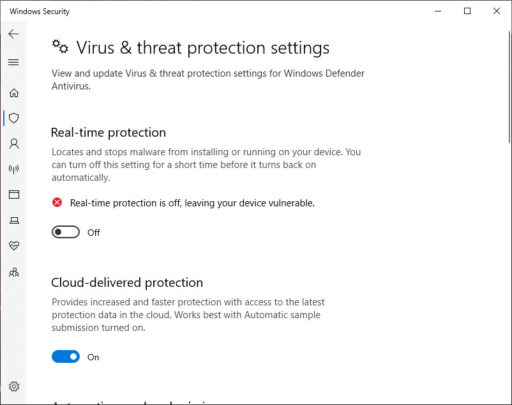
- Turn off the Real-time protection toggle switch.
This method will allow you to do the specific task that you couldn’t because of the antivirus restrictions. Once you are done you can follow the steps above to re-enable the Real-time protection. Real-time protection will also be enabled if you restart your Windows 10 device.
Disable Windows Defender Using Group Policy
This method is available to Windows 10 Pro and Enterprise customers using the Local Group Policy Editor. For those with Windows 10 May 2019 Update and higher, you will need to disable Tamper Protection.
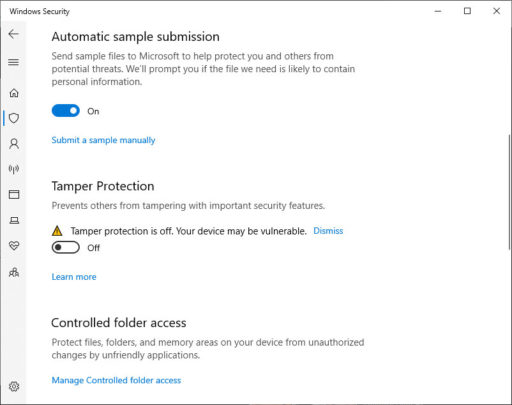
Tamper protection is a feature designed to protect the Windows Security app against unauthorized changes that are not made directly through the experience. Without disabling Tamper protection and since we’ll be using the Group Policy, the antivirus will restart automatically in the next reboot of our device.
Disable Tamper Protection
To disable Tamper Protection on Windows 10, use these steps:
- Open Start.
- Search for Windows Security and click the result to open the app.
- Click on Virus & threat protection.
- Under the Virus & threat protection settings section, click on Manage settings.
- Turn off the Tamper Protection toggle switch.
You are now ready to disable Windows Defender Antivirus permanently using Group Policy.
Follow these steps below to proceed:
- Open Start
- Search for gpedit.msc and click the result to open the Local Group Policy Editor.
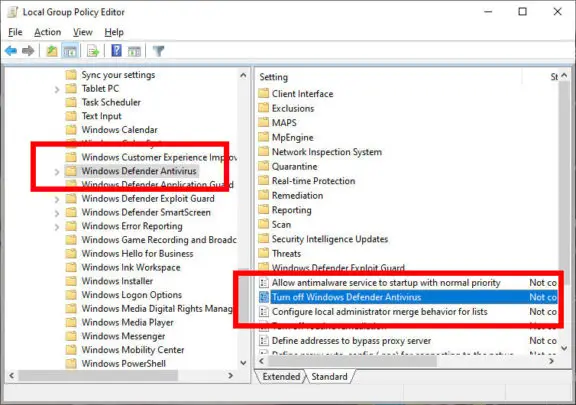
- Browse the following path:
Computer Configuration \ Administrative Templates \ Windows Components \ Windows Defender Antivirus - Double-click the Turn off Windows Defender Antivirus policy.
- Select the Enabled option
- Click the Apply button then OK button
- Close all open windows and restart your device
Your antivirus is now permanently disabled. The “shield” icon will remain in the taskbar as a reminder. You should not worry about it as this is the expected behavior.
You can enable the antivirus anytime you wish by following the above steps until step 5 where you will select the Not Configured option. Enable the Tamper Protection feature then restart your device to apply the changes.
Disable Windows Defender Using Registry
Alternatively, you can use this method if you don’t have access to the Local Group Policy Editor.
Warning: Editing the Registry is always a risky endeavor that can cause irreversible damage to your device if done incorrectly. Therefore it is recommended to make a full backup of the registry and even the data on your device before proceeding.
Once again before you begin, follow the steps above to disable Tamper Protection.
- Open Start.
- Search for regedit and click the result to open the Registry Editor.
- Browse the following path:
HKEY_LOCAL_MACHINE\SOFTWARE\Policies\Microsoft\Windows Defender
Or simply copy and paste it into the Registry’s address bar. - Right-click the Windows Defender (folder) key, select New and click on DWORD (32-bit) Value
- Name the key DisableAntiSpyware and press Enter.
- Double-click the newly created DWORD and change the value from 0 to 1
- Click the OK button.
- Close all open windows and restart your device
Windows Defender Antivirus is now completely disabled.
You can revert the changes by repeating the same steps outlined above, but on step No. 6, right-click the DisableAntiSpyware key and select the Delete option.
Conclusion
Just because you can disable Windows Defender Antivirus, it is not recommended running your device without an active anti-malware software.
First, determine whether you simply need to temporarily disable it on a case-by-case basis. Then and only then should you make a decision for a more permanent option. Also if you install a third-party antivirus then Windows will disable Windows Defender automatically.
Found this article interesting? Follow Brightwhiz on Facebook, Twitter, and YouTube to read and watch more content we post.