It is no surprise that many find it appealing and more-so convenient to retrieve all their emails from Gmail email servers. This is because over the years Gmail has built a solid reputation for being stable, fast, and amazing at dealing with Spam mail. You can leverage those features on all your email account by redirecting them to the latter.
It is a simple eleven-step process that will get you on your way. The settings are quite self-explanatory but we will still go ahead and walk you through the process in this configuration guide. The guide below assumes you have already set up a custom domain such as yourdomain.com or you are running another email service such as Yahoo.
The Gmail Email Setup Process
- Log into your Gmail email accounts by going to gmail.com and access the settings panel from the standard inbox by clicking on the cogwheel Icon on the top right and clicking Settings on the drop-down.
Note: This must be done from a computer and you cannot use the HTML view (the older Gmail inbox for those with slower connections)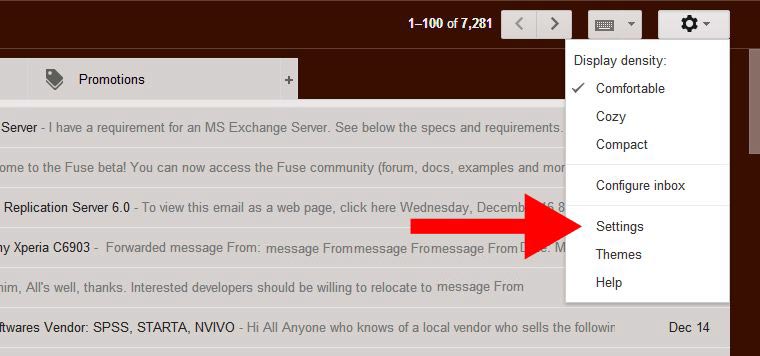
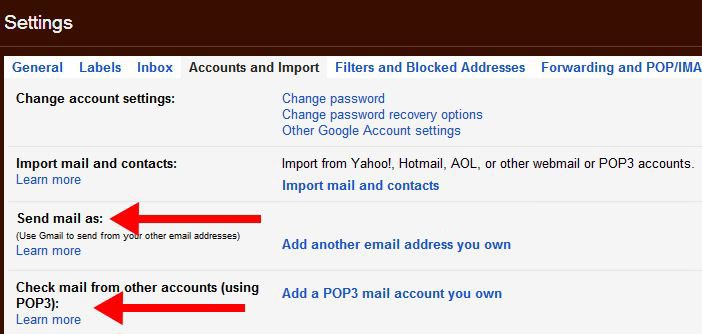
- In the Settings panel click on the Accounts and Import tab to access the configuration forms

- To be able to send an email and receive an email from your @yourdomain.com address you need to change the settings in the sections labeled “Send mail as and Check mail from other accounts (using POP3):
- We will start with receiving email. Click on the link as seen in the image above that is labeled “Add a POP3 mail account you own” to get a popup which you will enter the email address and click on the Next button to get the following screen:
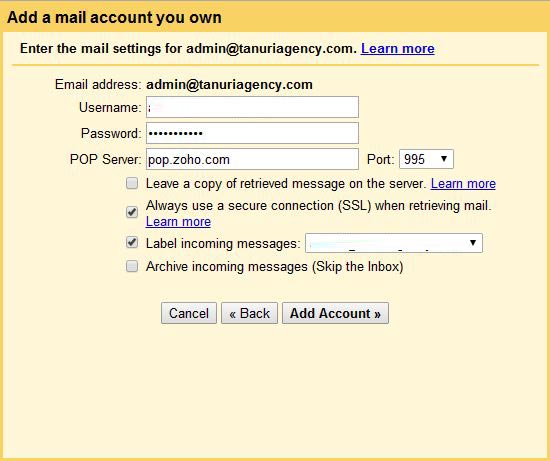
- In the screen above enter the email address as your username. Change the POP Server to the credentials given in the section above and use 995 as the Port. Make sure the items “Always use a secure connection (SSL) when retrieving mail” is checked. You can choose to leave Label incoming messages checked. Leave the other two checkboxes unchecked. Then click on Add Account. If all the credentials are okay the connection should be accepted.
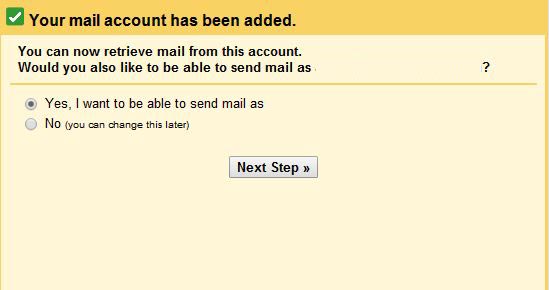
- On the next screen select “Yes, I want to be able to send mail as [email protected]” then click the “Next Step” button. This is so that you can be able to send emails directly from Gmail under your selected email address:
- Next, you want to specify whether the email should be treated as an alias and also whether you want to specify a different reply-to address. The choice on these matters is up to the individual user. To understand more you can click on the Treat as alias “Learn More” to understand which scenario best works for you. If you do not understand you can leave the defaults as they are:

- Click on the “Next Step” button when you are through making changes on the above step
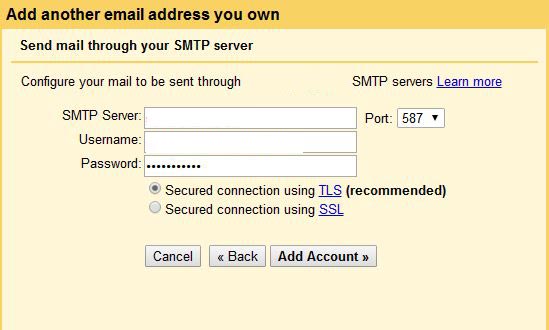
- Again using the credentials provided earlier in this section enter the correct details relevant to your account as shown in the image below then click the “Add Account” button:
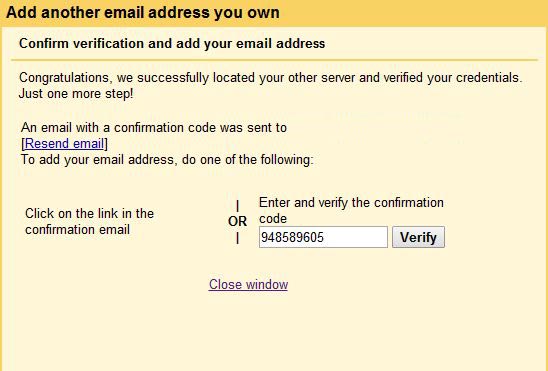
- Go back to your current email service and log in to your account then open the confirmation email from Gmail email and retrieve the verification code. You will use this code to enter into the field labeled “Enter and verify the confirmation code” and click the “Verify” button or you can simply click on the link provided in the email to finish the process:
- Once confirmed you will be able to send emails out using your [email protected]
That’s it you will now be able to access your Gmail email as well as read all your custom email accounts that you have linked from one interface.
Found this article interesting? Follow Brightwhiz on Facebook, Twitter, and YouTube to read and watch more content we post.